|
|
| |
|
| |
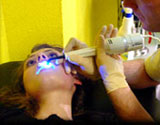
How
is the Tooth jewelry attached?
|
| |
|
| |
|
The
tooth is cleaned with a fluoride-free polishing paste.
The surface of the tooth is etched on to roughen it.
Bonding and a small amount of light curing composite
is applied.
The
jewel is set into the composite and aligned within 20
sec.
|

|
A
high-intensity curing lamp is used to harden the composite
for approximately 60 seconds.
After
about 4 minutes total the stone is safely fixed.
For
remineralization the enamel may be treated with fluoride.
|
|
|
|
|
|
|
Removing
Tooth Jewelry
The jewel
is removed the same way as an orthodontic bracket is and the
enamel will not be harmed. After your dentist removed
the gem, the tooth needs to be polished, which takes away
any remaining bonding materials.
|
| |
|
| |
Bonding
Instructions for Dental Professionals |
| |
Please
note that proper attachment of the tooth jewelry is only guaranteed
if you follow these recommendations.
Use a
light cured, transparent, flowable composite for application
(such as VOCO Fissurit or Syntac Tetric-Flow).
- Disinfect
the jewel in alcohol prior to the application. Do not
touch the jewel with your fingers once it's removed from
the case. To guarantee maximum adhesiveness, it is essential
to avoid skin contact with the special coating on the backside
of the jewel.
- Clean
the surface of the tooth with a fluoride-free polishing
paste. Completely dry and isolate the tooth.
- Apply
Etchant (such as Vococid) to the enamel for about 30 sec.
- Rinse
surface thoroughly with water and blow dry for 10 sec. each.
(No Etchant should remain on the tooth!) Please follow protective
measures when using the Etchant.
- Apply
a light-curing bonding agent (such as Syntac Heliobond).
Leave it on for a max. of 10 seconds, distribute bonding
through air blowing, then light-cure for 20 sec.
- Apply
a small amount of flow composite to the surface of the tooth.
Use a flat composite condenser/plugger with a trumpet shaped
tip with a little bit of Vaseline on the end to easily pick
up the jewel. Press it into the center of the composite.
(The composite must ooze out a bit on the sides so the jewel
is encircled by the Composite ensuring macromechanical retention,
but make certain the jewel is in contact with the enamel.)
- Now
you may adjust the jewel while letting the patient check
the desired positioning in the mirror.
- Take
the light-curing lamp and start hardening the composite
from the top for about 60 seconds. Light cure from the sides
for a few seconds and also harden the composite from the
back of the tooth for another 60 seconds making sure the
composite hardens evenly. Total curing time is approximately
180 seconds. (Follow instructions of the bonding-system
you are using!)
- You
may carefully polish any sharp edges of the composite with
a rubber point if needed.
If you
have any further questions we will be happy to hear from you!
You may
also download these instructions as a Word
document.
|
| |
Removing
the jewel
Use a
scaler or an appropriate pair of tweezers or pliers (sharp
and pointed) when removing the stone. In case of leftover
bonding or composite on the tooth, simply remove it by using
a polishing tool. It is recommended to treat the tooth with
fluoride, so remineralisation and stabilization of the enamel
is provided.
|
Disclaimer:
DecoDent is not responsible for any injuries that may result from
bonding, use or removal of the Tooth Jewelry.
|
